
In this blog post, I will show you how to start a blog and make money for beginners with just the most basic computer skills.
Starting a blog can be overwhelming for beginners. But the truth is that starting a blog is no big deal but staying consistent is where people fail.
Although starting a blog may seem like an overwhelming task for some, it can be relatively simple when done correctly and there are multiple ways in which this site will make that process easier than ever before.
The Problem
From past experience the most important issue is this...
- philip Borrowman
I’ve been blogging since 2015 and I can emphatically say that starting a blog is not as complicated as many people think.
It doesn't matter if you are not a great writer. It doesn’t matter if you don’t think you have anything to say. What does matter is that you are willing to put the effort in.
If you have decided to give it a try and want to be a successful blogger and build a profitable blog, then the first thing you have to do is JUST GET STARTED BLOGGING, here is how you can do that.
Follow these several critical steps to have an optimal start!
STEP 1: CHOOSING A NICHE
1-1 Keep It Simple
The most important step before you start blogging is to choose a niche. Unfortunately, choosing a niche is the first stumbling block for beginners bloggers.
Do not overthink your niche, most niches are either providing help on how to solve a problem or pointing out problems and later seek who can solve them.

Make a list of those niches which you are good at or maybe you are interested in writing on those niches. Your blog is built on the need for information about a specific query.
Think about something you are interested in, you don't need to know everything about your niche. You can start your niche blog with limited knowledge about that niche.
If you are interested in it you can talk and write about it and learn more about it without getting bored with the subject. When you start researching, developing, and creating blog posts then your niche knowledge increases.
Then think about the audience you want to target, that may help you narrow your niche down an bit.
Explore Your Niches
Try to take some time and dig down into place like Facebook, Quora, Reddit or YouTube to look for hidden niches and ideas.
1-2 Listing And Narrowing Down Your Niches
Do not choose niches that are too broad. For the beginners, narrowing down your niche is essential and this makes it possible for you to know "what your audience want" and makes your blog possible to get traffic, leads and sales.
If you choose a micro niche (specific niche), then you can target the correct audience with relevant content, promotions and value.
Once your audience visit at your website, their intent will be clear and you can provide valuable information in real time.
Here is an example that can inspire you to find an appropriate micro niche (specific niche).
EXAMPLE
An example of a niche being narrowed down so you can do this yourself when you find your niche ideas.

Pet (Too Broad)
This niche is very broad. "Pet" has dozens of sub niches and content potential so how do you narrow this down?

Pet Training
Good, but it is still quite vague. Will this website be suitable for Cat? Dog? Parrot?

Dog Training
Well targeted and micro niche audience. This makes the audience well targeted and easy to serve content to.
Learn more about: "How to Find a Niche for a Blog – The Ultimate Guide for Beginners".
STEP 2: BUILDING YOUR WEBSITE
2-1 Choose Your Domain Name
Choosing a good domain name is really the important task for starting a blog. As a beginner, my suggestion is that do not overthink the process of choosing a domain name and do not add any special characters, symbols or weird letters for your domain name.
Follow these simple 4 rules and pick a suitable domain name.
Only use “.com”
“.com” is not only the most established and credible domain name extension but also the most memorable. I strongly recommend using ".com” only.
Keep your domain name short
The shorter the domain name is, the easier it is to remember and less prone to spelling mistakes. But don't be so focused on length that you change it to a bizarre name that doesn't make sense.
Make it easy to pronounce and spell
Your domain name should have simple spellings and simple words. Easy spellings and pronounces increase the chances of the user typing the correct spelling in the search bar. Remember that choosing a domain name should avoid difficult spellings.
Keep it unique and brandable
The name that you choose is what you’re using to represent your blog. You should avoid any cryptic names that could be misleading for your audience. Remember to choose a domain name that is unique, catchy and memorable.
2-2 Checking your domain name if it is available
After you have chosen your domain name, then the first thing you should make sure before you register a domain name is if someone is already using the same or similar domain name.
Checking Your Domain Name Below:
2-3 Domain Name and Hosting Registration
When you have picked your domain, the next step is to buy a name and pick out hosting that suits the needs of your website. Choosing a hosting company that offers WordPress-specific hosts is essential for building your website on this platform.
The best part about purchasing the domain and hosting service from the same provider, you save money and it simplifies what could be an otherwise complicated process when everything goes smoothly.
There are many domain name registrars and web hosting providers available. But the point is, which one is the best and affordable. You should choose a reliable domain registrar who offers trustee service.
For beginners, I would highly recommend SiteGround. SiteGround is by far the best product I ever use. Their support is fantastic and the speed is awesome and everything is there and easy to use. It is fantastic value for money.
SiteGround's customer service and performance are better. But if you are on a tight budget, then Bluehost is still a good choice because they have great uptime and the features for WordPress are also good. check out my guide on How to Create a WordPress Website or Blog With BlueHost.
Do not buy cheap hosting, do not buy one-time fee hosting. Some of the mainstream hosting providers, even though cheap, are incredibly poor value and have very bad customer service.
Click the link below to create your SiteGround account.

- Click on the link above to access the SiteGround website, then go to the Web Hosting icon and click on the "GET STARTED" button.

- Choosing your package here, you can choose the StartUp package that is very basic and you're only allowed one website, or if you have web addresses or multiple websites that you want to set up then GrowBig package might be the best one for you.

- Choosing and registering your new domain here. Then click on the “PROCEED” button.

- Filling in the information form: 1. Account Information, 2. Client Information, 3. Payment Information

- Choosing hosting services period, I recommend choosing the 12 months package.

- Choosing extra service. You can choose it or not for the Domain Privacy option. Domain Privacy service is a good precaution to make to secure your information. I recommend choosing the Domain Privacy service. It is definitely better to have it than not however and at an affordable price with most registrars.

- Your account was successfully created, then click on the “proceed to customer area” button.

- Using your email and logging in again.

- Check your email and to confirm your registration, then verify your domain name.


Congratulations, you have completed the domain name and hosting registration.
2-4 Install WordPress & Security Settings
- Go back to SiteGround homepage then click on the “SET UP SITE” button.

- Select “Start New Website”, “WordPress” buttons and set up login details for your WordPress. Then, click on the “CONTINUE” button


- Click on the “Finish” button.

Then, click on the “MANAGE SITE” button.

- Clink on:
- SECURITY/SSL Manager
- Select your domain name
- Select SSL/Let’s Encrypt
- “GET” button

- "Let’s Encrypt" is installed for your website. Next, click on the “HTTPS Enforce”

- Turn on the HTTPS Enforce function.

Congratulations! Now,your website is secured.
2-5 WordPress Basic Settings
Go to Siteground dashboard, then click on:
1. "WORDPRESS/Install & Manage"
2. Login icon to log in to WordPress admin panel

- Click on the “START NOW” button.

- Choose any one of the themes.
At this stage, a theme that you choose needs to be as simple as possible. I recommend follow along and choose the same theme. Later, I will show you how to add a beautiful theme and make your website look amazing.

- Click on the “CONTINUE” button.

- Unselect the “Contact Form”

- Do not choose any of these items here. Then click on the “CONTINUE” button.

- Again, do not choose any of these items here. Then click on the “CONTINUE” button.

- Congratulations! Now,your website is ready.

Watch the following video for this step by step tutorial.
Domain Name Registration and Hosting Service for SiteGround - Step by Step tutorial.
SiteGround & WordPress Explanation

WordPress
WordPress is your website editor. It does not require any web programming language expertise to manage content on a WordPress content management system.
It is very easy to use this software to create and update the pages and content on your site. This is how you add and keep it up to date with relevant content to your site.

2-6 Create and Set Up Branded Email Address
Using a real email address with your domain name is important to make your website recognizable so your audience can quickly associate an email with your website.
It will also make you more professional and help you build familiarity with potential customers who signed up to learn more about what you have to offer.
Follow these simple steps to set up your Branded Email Address.
- Access to the SiteGround “WEBSITES” page, then click on the “SITE TOOLS” button.

- Access to EMAIL/Accounts, type your email account name that you want and set up your password. Then click on the “CREATE” button to create your email account.

- Change Quota

- Maximize the inbox size then click on the “CONFIRM” button.

- Log in to your Webmail.

- Now, you can send and receive mails here to check if it works.

Watch the following video for this step by step tutorial.
How to Create and Set Up Branded Email Address for SiteGround - Step by Step tutorial.
STEP 3: BUILDING THE BASIC FRAMEWORK OF YOUR WEBSITE
In this section I will show you how to set up an SEO ready and safe website.
3-1 Choose a Page Builder Plugin for Your WordPress
A simple “drag and drop” page builder plugin can give beginners the ability to build beautiful custom layouts and landing pages on websites. In addition, a good page builder also helps developers speed up when creating custom designs and allows them to work efficiently.
There are many page builder plugins now for WordPress in the market that can help you to create a professional WordPress site on your own, with no coding skills required. The one I like is the Thrive Architect (All-In-One Page Builder) plugin.
Thrive Architect is easy-to-use and beginner-friendly. It has an awesome feature to build a good looking site and is by far the best page builder for beginners to use.
You have to have Thrive Suite Membership to get the Thrive Architect plugin and other amazing plugin tools. And I will use the Thrive Architect plugin to edit pages and posts, and Thrive Theme Builder plugin to edit and optimize the "Shapeshift" theme for my following tutorial.
Read more about: Thrive Themes Reviews – Is Thrive Suite Worth Buying?
3-2 Install Your Thrive Architect (All-In-One Page Builder) plugin
Thrive Suite is an All-in-One Toolbox to create a WordPress website that converts visitors into leads and customers. “Thrive Suite” help you to build a conversion-focused WordPress website without needing to know how to code or design. It is worth every penny.
Click the link here to get Thrive Suite.

Watch the following video to get a clear overview of what this Thrive Architect (WordPress page builder) can do.
3-3 Choose Your Theme (Twenty Nineteen)
As a beginner, all you have to do is keep things simple. I recommend choosing “Twenty Nineteen”. As you can see that it is a very nice typography. It has lot of white space and it really drives the user to read the blog posts.
- Access to WordPress dashboard, then go to Appearance/Theme.

- Click on the “Add New” button.

- Search for “Twenty Nineteen”. Then click on the “Activate” button to activate the theme.

At this stage, a theme that you choose needs to be as simple as possible. I recommend follow along and choose the same theme. Later, I will show you how to add a beautiful theme and make your website look amazing.
3-4 Set Up A SEO Friendly Site
Access to WordPress dashboard, then go to Settings/General.

- 1. Add a site title and tagline to your site.
- 2. Add an S to "http" makes it become "https".
- 3. Change your Email address for your new branded email address.
- 4. Choose “Date Format” and “Time Format”
- 5. Click on the “ Save Change” button to save the change.


3-5 Change the permalink

- Go to Settings/Permalink.

- I suggest choosing “Custom Structure”.
- Choose: 1. %category% 2. %postname%. Then click on the “Save Changes” button.
- Your permalink structure should be: http:// YOURNAME.com/%category%/%postname%

3-6 Add the All In One SEO plugin and change the settings to be a SEO friendly website.
- Go to Plugins/Installed Plugins.

- Deactivate and delete “WordPress Importer” and “wordPress Starters” plugins.


Always update those plugins which need updating!
- Then click on the “Add New” button.

- Search the “All In One SEO” plugin and install it.

- Then, go to Plugins/Installed Plugins, you will see the “All In One SEO” plugin has been installed.

- Then, go to the Dashboard/ All in one seo. Click on the “Launch the Setup Wizard” button.

- Click on the “ Let’s Get Started” button.

- Select the “blog” category.

- Add your “Home Page Title” and “Meta Description”. Then, click on the “Save and Continue” button.

- Here is what appears in google when someone searches for your url.

- Add the Additional Site Information.
1. Choose “Person” or “Organization”
2. Choose your branded email. (You can go to Gravatar and create an account using your email.)
3. Upload your Social Share Image
4. Add your social profiles urls, or you can come back and add it later.
5. Click on the “Save and Continue” button.


- Then, click on the “Save and Continue” button.

- You can see your website search appearance here.

- Then, click on the “Save and Continue” button.

- Then, click on the “Save and Continue” button.

- Then, click on the “Skip this Step” button.

- Click on the “Finish Setup and Go to the Dashboard” button.

Congratulations, you have completed the basic setting of “All In One SEO” plugin. Your site is now SEO ready!
Watch the following video for this step by step tutorial.
How to Set Up A SEO Friendly Site for Your WordPress - Step by Step tutorial.
3-7 Create and Setup Your Website Core Pages I
3-7-1 Create The "Homepage", “Contact Us/Me”, “About Us/Me” And “Blog” Pages.
- Access to WordPress dashboard, then go to Pages/Add New.

- Create a page called “Homepage”. Then click on the “Publish” button to publish this page.

- Then click on the WordPress logo and go back to your WordPress dashboard.

- Repeat the above process to create “Contact Us/Me”, “About Us/Me” and “Blog” pages.

3-7-2 Core Pages Basic Settings
1. Go to Settings/Reading, choose “A static page”.
2. Choose : Homepage >>> Homepage
Posts page >>> Blog
3. Then click on the “Save Changes” button.

- Go to Appearance/Widgets, then delete all the widgets.

- The reason for deleting all the widgets is to keep your website clean.


3-7-3 Complete editing for your “Contact Us” page
Go to Pages/All Pages, then click on the “Contact Us” page.

- Click on the “ Launch Thrive Architect” button.

- Choose “Normal Page”.

- Click on the ”+” icon. And you can see the function icons here!

- Search for “contact form” on the search bar. Then, click on the “contact form” icon.

- Choose one of the templates, then click on it.

- Click on the “Add Connection” button.
Then,
1. Choose “Email” for “Connection”
2. Choose “Send email from this site” for “Email delivery service”
3. Click on the “Compose Email” button.

- Put your branded email address that you have created before.
When someone comes to this page and submits a message to you, you will then get the email.
- Turn on the “Send confirmation email to the user that submitted the form” icon. Then, click on the “Save and Apply” button.

- Use the default confirmation content or add some words that you want to deliver to the submitters.
- Then, click on the “Save and Apply” button.

- Go to the “Add New” icon. Then choose “GDPR Checkbox” for “Field type”, and untick the “Email” icon. It means that when someone submits the form here, they have to agree to receive emails from you.
Then click on the “Apply” button.

- Click on the contact form. Then, click on the “Edit Form Elements” button.

- Click on the “[Legal] Privacy policy”, then click on the “delete” icon to remove it.

- Delete the words "or phone” from this sentence, and add the words “Privacy Policy” to this sentence. We’ll come back later and link to this “Privacy Policy” once we have created it. Then click on the “Done” button.

- Click on the “SAVE WORK” drop-down menu, and click on the “Save and Preview”.

- Congratulations, you have completed the “Contact Us” page. Now, you can test this form to check that if it works.

3-7-4 Complete editing for your “About Us” page
Use the “Thrive Architect” plugin to complete your “About Us” page.
As a new blogger, writing a good about us/me page isn’t an easy task. It should be as authentic and as credible as possible. You can write it in the formal or informal style you wish.
Try to write a short, simple and to the point about you. Tell your audiences about you, what your niche is and what you will try to achieve with your website. You can come back and update your content at any time.
3-8 Create a Primary Menu to display on homepage
- Go to Appearance/Menus, then click on the “View All” button.
Tick on these 4 pages, then click on the “Add to Menu” button.

- Tick on “Primary”, then click on the “Save Menu” button.

3-9 Create and Setup Your Website Core Pages II
3-9-1 Create the “Affiliate Disclosure”, “Privacy Policy” and “Terms & Conditions” pages.
Follow the method taught earlier, add the “Affiliate Disclosure”, “Privacy Policy” and “Terms & Conditions” pages.
3-9-2 Complete editing for your “Affiliate Disclosure” page
- Go to your “Affiliate Disclosure” page, then click on the “ Launch Thrive Architect” button.

- Choose “Normal Page”.

- Click on the ”+” icon.

- Click on the ”Text” icon.

- Download the "Affiliate Disclosure Template" below. Copy and paste this affiliate disclosed over to your Affiliate Disclosure page.

- Use “ Ctrl + f ” to search “YOURWEBSITE” and replace it with your domain name.

- Highlight “Federal Trade Commission” and insert the website link. Then click on the “SAVE WORK” button.

3-9-3 Complete editing for your “Privacy Policy” page
Use Privacy Policy Generator to generate your own “Privacy Policy” page.
- Access to Privacy Policy Generator, and fill in your company name, your website name and your website URL. Then click on the “Next” button.

- Choose the “Yes” option, then click on the “Next” button.

- Choose your country and fill in your email, then click on the “Generate My Privacy Policy” button.

- Copy all the texts that you have generated.

- Paste it to your “Privacy Policy” page. Then go to the “Google DoubleClick DART Cookie” section, find out the “www.website.com” and replace it with your domain name.Then click on the “SAVE WORK” button.

3-9-4 Complete editing for your “Terms & Conditions” page
Use Terms & Conditions Generator to generate your own “Terms & Conditions” page.
- Access to Terms & Conditions Generator, fill in your company name, your website name and your website URL. Then click on the “Next” button.

- Choose your country and fill out your email, then click on the “Generate My Terms & Conditions” button.

- Copy all the texts that you have generated.

- Paste it to your “Terms & Conditions” page. Then go to the “Your Privacy” section, highlight the“Privacy Policy” and add a link to your “Privacy Policy” page URL.
Then click on the “SAVE WORK” button.

3-10 Create a Footer Menu to display on homepage
- Go to Appearance/Menus, then click on the “create a new menu” icon.
Name the menu “Footer” - Tick on the Footer Menu icon, then click on the “Create Menu” button.

- Select “Footer Menu”, then click on the “select” button.
- Tick on these 3 pages, then click on the “Add to Menu” button.

- Click on the “Save Menu” button.

- Congratulations, you have created your “Footer Menu”.

3-11 Other Settings
3-11-1 Add your “Privacy Policy” to your “Contact Us” page
- Go to your "Contact Us" page. Copy your “Privacy Policy” URL and link it to your “Contact Us” page. Then, click on the “DONE” button.

- Click on the “ SAVE WORK” button to save the change.

3-11-2 Delete the themes that you are not using on your site.
- Go to Appearance/Theme, click on the theme that you want to delete.

- Then click on the “delete” button.

Now, you only have the “TWENTY NINETEEN” theme.

3-11-3 Set your Privacy Policy inside the "Privacy" page inside the "Settings" tab.
- Go to Settings/Privacy, click on the drop-down menu and choose the “Privacy Page”.
- Then, click on the “ Use This Page” button.

STEP 4: OPTIMIZING YOUR WEBSITE
If you have an existing website that you have already created, then do not follow the following tutorial. Doing so will remove your website's custom coding, CSS scripts and mess up your blog post layouts.
4-1 Optimizing your theme
4-1-1 SG Optimizer Deactivation
Go to WordPress dashboard/Plugins/Installed Plugins.
Click on the SG Optimizer “Deactivated” icon.

4-1-2 Install the “Shapeshift” theme.
Thrive Suite is an All-in-One Toolbox to create a WordPress website that converts visitors into leads and customers. “Thrive Suite” help you to build a conversion-focused WordPress website without needing to know how to code or design. It is worth every penny.
You have to have Thrive Suite Membership to get the "Thrive Architect" Plugin, “Thrive Theme Builder” Plugin, “Shapeshift” theme and other fantastic tools.
<<<Thrive Themes Reviews – Is Thrive Suite Worth Buying?>>>
- Go to WordPress dashboard/Product Manager. Tick on the “Install product”, then click on the “install selected products” button.

- Click on the “Go to the Theme Builder Dashboard” button.

- Click on the “Get Started!” button to the site setup wizard.

- Logo
Upload a Logo for your Site, then click on the “Choose and Continue” button.
The Logo recommended size is 250 px x 40 px. You can go to “Canva” to design a Logo for your site.

- Brand Color
Choose a brand color this can be any color you like and this will be the main color on your website.
Then, click on the “Choose and Continue” button to the next step.

- Header
Choose your header, as you can see from this quick tip you can either use your arrow keys or you can use this menu to see the different header designs in thrive theme. Then, click on the “Choose and Continue” button to the next step.

- You can go through those designs and then look at the one that resembles most what you are looking for and select the header that is closest to what you are going for.

- As you can see the selected header will immediately use the logo that you uploaded so that you already get an idea of what this will really look like on your website.
Then, click on the “Choose and Continue” button to the next step.

- Footer
Select a footer, again you can use this menu to see the different Footer designs. You can have a ton of links in your footer or you can have opt-in forms, contact forms anything you want and pre-designed for you, it's all up to you.
As a beginner, I recommend choosing a really simple one.
Then, click on the “Choose and Continue” button to the next step.


- Homepage
You have three options,
You can choose from the pre-designed home pages, you can use one of your existing pages or you can display your blog page as your home page.

- We already have a homepage now, so we can choose the “ Display one of your existing pages”.

- Choose your homepage here. Then, click on the “Choose and Continue” button to the next step.

- Single Blog Post
Choose your blog post design here. What do you want your blog post to look like? You can again use this menu to choose from a selection of pre-made templates.
Choose the full-width featured image or a split top on your website.
Then, click on the “Choose and Continue” button to the next step.


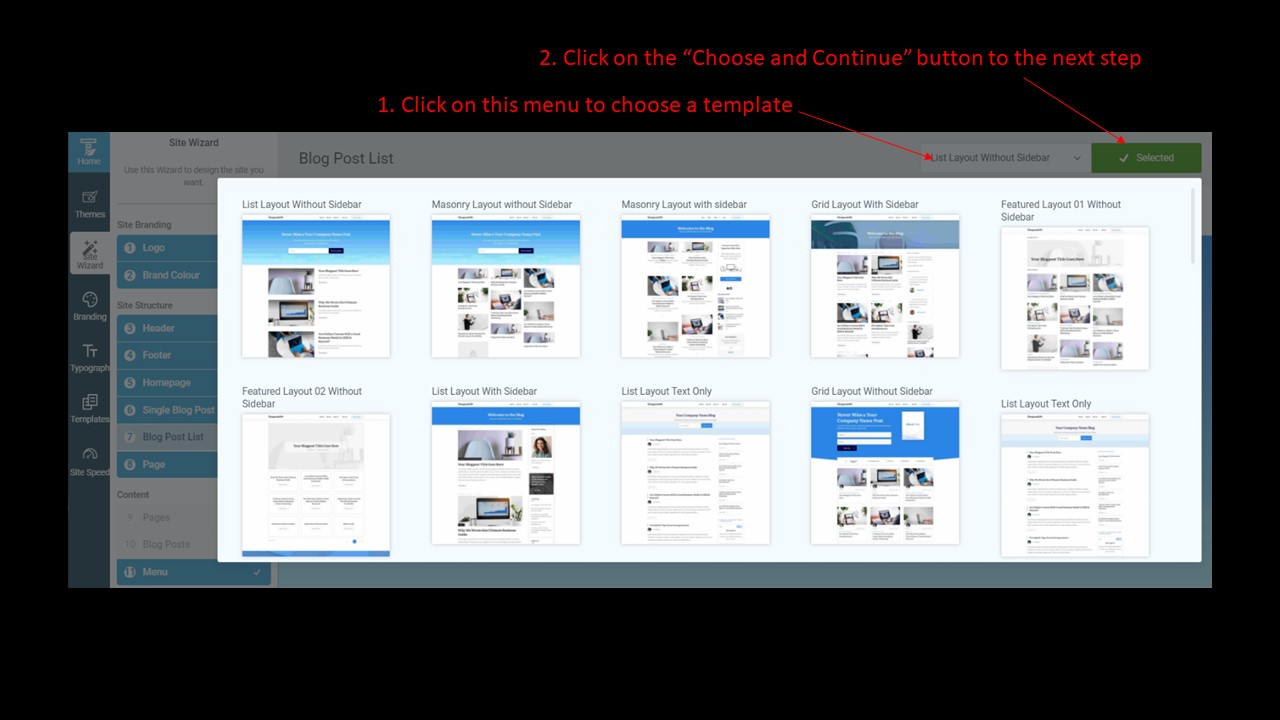
- Blog Post List
It's time to decide what your blog page will look like. You can again use this menu to choose from a selection of pre-made templates. You can choose a list layout, a grid layout or a masonry layout; it really is up to you.
Then, click on the “Choose and Continue” button to the next step.

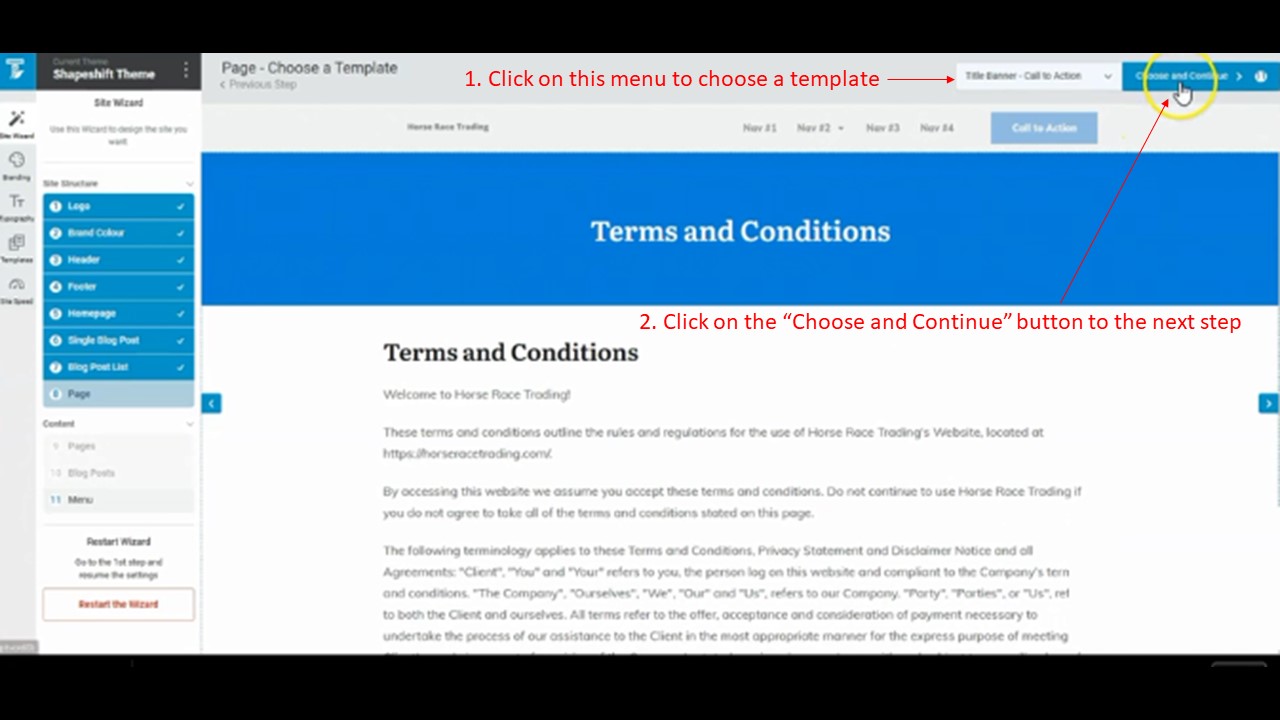
Page
And then the last layout decision is about your default pages. If you click on this menu you will get a whole bunch of pre-designed page templates and that is ready for you.
Then, click on the “Choose and Continue” button to the next step.

- Choose a Menu
Select your Header Menu and Footer Menu here. Then, click on the “Activate Menu on my Site” button.

- That is it. You have completed the Wizard Setup.

4-2 Optimizing your Site Speed
- Go to Thrive Theme Builder dashboard/Site Speed. Click on the “Minification and Caching” icon.

- Choose the “WP Faster Cathe” and click on the “Install Now” button.

- Click on the “Activate” button.

- Click on the “Configure for Optimal Caching with Thrive” button.

- Click on the “Yes, configure the cache” button.

- Then, click on the “Image Optimization”.

- Choose the “No Cost” option, then click on the “Install Now” button to install the “Smush”.

- Click on the “Accelerated Mobile Pages”.

- Tick on the “Enable AMP” icon.

That’s it, the Site Speed Optimization have been completed.
4-3 Optimizing Your Author Box
- Go to WordPress dashboard/users/ All Users. Then, click on the “Edit” button.

- Fill in your details for Name, Contact Info, and About Yourself sections.


You can add your social profiles urls here, or you can come back and add it later.
Then click on the “Update Profile” button.

4-4 Smart Site Settings
Add global information that can be used in many places on your site. Such as, your company name, address, phone number..etc.
- Go to the thrive dashboard you will see that you have this card that says "Smart Side". Then, click on it .

- Add your global information here.

From here you will be able to add global fields and these global fields will be used throughout your theme which makes it super easy and fast to keep your website up to date.
If you change your phone number for example you don't have to go through every page where you used your phone number. You can just change it in one spot and this smart side setup and the global fields makes it super fast to create and keep your website up to date.
4-4-1 Optimizing Your Footer of the Theme
Add “Privacy Policy”, “Terms and Conditions” and “Contact” pages to the Footer of the theme.
- Go to WordPress dashboard/Thrive Theme Builder/Templates. Choose any one of the pages, click on the “Edit” icon.

- Scroll down to the “Footer” section and click on it, then click on the “edit” button.

- Click at the end of this text.
- Click on the icon here.
- Choose Global fields for Dynamic text, then choose “Privacy Policy” for Selection option.
- Click on the “Insert” button.

- As you can see, we have added a “Privacy Policy” at the end of the text.

- Follow the above steps, add “Terms and Conditions” and “Contact” to the Footer of the theme. Then click on the “Done” button.

- Click on the “Save work” button to save the settings. As you can see, we have added “Privacy Policy”, “Terms and Conditions” and “Contact” pages to the Footer of the theme.

STEP 5: CONNECT THE WEBSITE TO GOOGLE ANALYTICS AND GOOGLE SEARCH CONSOLE.
These two tools are important and can help you to analyze your data in terms of traffic coming to your website.
5-1 Create a new Gmail account
First, I recommend creating a new Gmail account to control ALL your Google properties, including YouTube Channel, Google Analytics, Google Drive, Google Search Console and so on.
5-2 Create and Setup a Google Analytics Account
- Login to your gmail account and go to the Google Analytics homepage. Click on the “Start measuring” button.

- Put your account name, and untick these 4 icons. Then click on the “Next” button.

- Put your account name, choose “Reporting time zone” and “Currency” options. Then click on the “Hide advanced options” button.
- Tick on the “Create Universal Analytics property”option. Then click on the "Next" button.

- Put your website URL, then click on the “Next” button.

- Choose the options for your business information. Then, click on the “Create” button.

- Tick on the “accept” icon, and click on the “I Agree” button.

- Close the pop-up page.

- Click on the “Save” button.

- Access to WordPress dashboard, go to All in One SEO/General Settings. Then, click on the “Webmaster Tools”

- Click on the “Google Analytics” icon, then click on the “Manage Google Analytics” button.

- Click on the “Launch Setup Wizard” button.

- Tick on the “Publisher (Blog)”option. Then, click on the “Save and Continue” button.

- Click on the “Connect MonsterInsights” button.

- Choose your Google account to sign in.

- Click on the “Allow” button.

- Click on the “Complete Connection” button.

- Click on the “Save and Continue” button.

- Click on the “Save and Continue” button.

- Click on the “Skip the Step” icon.

- Click on the “Finish Setup & Exit Wizard” button.

5-3 Create and Setup a Google Search Console Account
Google search console is a free webmaster SEO tool that provides details to help webmasters to monitor the traffic of websites.
You can obtain some valuable information by using Google Search Console. Such as,
- Login to your gmail account and go to the Google Search Console homepage. Click on the “Start now” button.

- Choose “URL prefix”, and put your domain name. Then, click on the “CONTINUE” button.

- For this “Verify ownership” page, go to “HTML tag“, click on the “COPY” button to copy the meta tag.

- Come back to your WordPress dashboard, go to All in One SEO/General Settings. Then, click on the “Webmaster Tools”
- Click on the “Google Search Console” icon, then paste the meta tag on the bar of “Google Verification Code”.

- Click on the “Save Changes” button.

- Come back to the “Verify ownership” page, then click on the “Verify” button.

- Click on the “DONE” button.

5-4 Submit your sitemap to Google
Go to Google Search Console dashboard, click on the “Sitemaps” icon.
Fill in “sitemap.xml” on the space, then click on the “SUBMIT” button.

Congratulations, your sitemap submitted successfully.

STEP 6: CREATING VALUABLE CONTENT
As a blogger, you should keep in mind that you should understand what the readers want and their pain points are. You need to find and solve your readers’ problems. Remember, your audience wants to know and how they want to understand certain information, and they don’t care what you care about.
- VALUABLE CONTENT is King.
- VALUABLE CONTENT is what binds you with your audiences.
- VALUABLE CONTENT is how you get traffic to your website.
- VALUABLE CONTENT is what you demonstrate your authority.
- VALUABLE CONTENT is what you meet a specified business goal.
There are several tips that can help you to write good and valuable contents.
6-1. Start with a “KISS”. “Kiss” stands for “Keep It Simple Stupid”.
When you write your contents, you should keep vocabulary limited and your sentences easy to read. Remember, people often want the quick and easy solution, shorter sentences and small paragraphs are effective.
6-2. Adopt “PAS” framework. "PAS" stands for “Problem-Agitate-Solution”.
First, you should clearly outline the audiences’ problems that they may be facing at the top of your article. And try to captivate the readers’ attention and get them hooked to your content by describing their pain points.
Second, try to agitate and dig the problems deeply. Point out why they may not be succeeding in their career or life. Paint a clear picture of the problems they may be facing which is stopping them from meeting their goals and achieving success.
In the end, provide a solution. Give the clear WHY, WHAT, WHEN, WHERE, HOW of your solution to show your audience how you can solve their problems.

"
“People don’t want to buy a quarter-inch drill, they want a quarter-inch hole!”
Professor Theodore Levitt - Harvard Business School
6-3. What is the purpose of your content.
Knowing the goal gives you direction when writing the content. It helps you understand who you are writing this for, what’s the problem you’re addressing, and what is the solution you’re providing. Your audiences want to know how your services or product will help them.
Some common goals include:
- Become a go-to article about a specific topic in your niche
- Educate readers about what’s trending
- Provide an in-depth analysis on a phenomenon like a high-performing product/service
If your service is writing about products in a niche, the value you provide is saving people time with thorough research and sound evidence behind why you recommend certain products.
Demonstrating your authority really gives readers confidence in what you’re writing about and gives them peace of mind when making a choice between products.
6-4. Creating SEO-friendly content.
Creating SEO-friendly content helps your articles appear in front of more viewers when they look for answers on search engines.
Content isn’t useful if no-one is reading it, no matter how well-written it is.
Creating SEO-friendly content can increase traffic to your site, get backlinks from sites with high-authority and generate more leads.
It’s important to optimize your site speed and readability. Make sure it’s a seamless experience transitioning from page to page. Because people always turn off and leave very quickly if your site loads very slowly or the widgets are misaligned.
6-5. Learn what keywords are and how to research them.
Keywords are the phrases people punch into Google or other search engines and try to find answers for their questions.
Find out and list all the keywords that are related to your content and you can analyze the intent behind them. Then, structure your content around these keywords and create content to help answer what people are looking for.
Learning how to create valuable content is a fantastic skill that will be useful for a while. I recommend attending courses by experienced writers or read books to learn some great copywriting and writing principles.
Don’t worry about whether your current content is good enough right now. Focus on improving with each article you write. Keep striving to be a bit better than you were yesterday.
You can start writing about things you’re interested in on your own blog. If your blog post gets enough traffic, you can even monetize it so it earns you a bit of passive income each month.
Learn more about: "How To Write SEO Articles For Beginners – Simple SEO Guide".
Wrap Up
By now, the tutorials have covered everything for starting a profitable blog. Your initial blog set up should now be finished and ready to go.
Let’s sum up what we have learned.
First, we chose a micro-niche, we got hosting and set up a domain name, then we installed WordPress, we got and optimized a theme for our site, we setted up the core pages including the contact form for our contact page and menus, we added plugins, we connected Google Analytics and Google Search Consoleand, and we wrote our first blog post.

Congratulations, now all you have to do is keep going, creating more blog posts, researching and expanding your niche knowledge.
Learn more about: "How Can I Make Money With a Blog? – The Proven Ways for Beginners"
If you are having any problems or by some unfortunate circumstance you get stuck, just get in touch with me or leave a comment below. I’ll help you out with any problems.

For The Newbie Bloggers:
The Ultimate Guide to Start a Profitable Blog Quickly
Without Coding Skills!
Great article , well explained and written. Well Done !
[…] If you don't have any idea about your domain name, here are some tips for choosing a domain name. […]